Make sure you are in Edit
mode and verify you are on the Format tab.
If the Format tab is not visible, check the More report options check
box.
A document can contain multiple reports. The name of the selected report
appears in the Current report drop-down list box.
Leave the displayed report
selected.
Or
Select a different report by clicking the arrow next to the Current
report drop-down list box, and then select a different report from the
list.
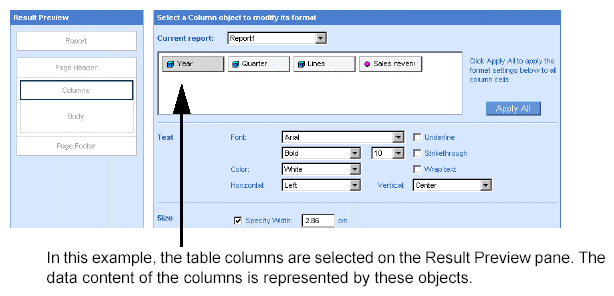
The Result Preview pane displays the structure of the table.

To select the area of the
table you want to format, click Columns, Rows, or Body on the Result Preview
pane.
The objects included on the selected part of the table appear on the
pane to the right of the Result Preview pane.
Each object represents a type of data included on the selected columns,
rows, or body.

Click the object corresponding
to the data you want to format.
For example, if you want to format how the Sales revenue results display
on the table columns, click the [Sales revenue] object.
If you want to apply the same formatting changes to all of the displayed
objects, select one object now to specify the formatting. You can globally
apply the formatting changes to all of the objects in step 6.
Specify the custom formatting
options you want to apply.

The following table will help you choose the appropriate options:

If you want to apply the formatting changes to all the objects in the selected column, row, or body click Apply All.
Click Run, if you are generating
the results for the first time.
Or
Click Apply, if you have already generated the results once.